Streamlining Compliance for Companies and
Solving the Retailer’s Dilemma
Streamlining Compliance for
Companies and Solving
the Retailer’s Dilemma
The e-Invoicing mandate in Malaysia requires all businesses to issue and submit validated electronic invoices for every transaction. For companies with a high volume of sales, particularly to customers who do not require a verified e-invoice, the process of submitting thousands of individual documents can be overwhelming.
The Consolidated E-Invoice is designed as a crucial tool to manage this high volume efficiently, but its application is highly regulated and differs significantly between business types.
During this period, companies can issue a consolidated e-invoice even for transactions where a buyer requests one, allowing them time to familiarize themselves with the process without immediate prosecution for non-compliance with the full rules.
The consolidated e-invoice is primarily intended for retail (individual) customers (B2C) at places like supermarkets, retails, gas stations, etc.
If a retail customer requires an e-invoice for a company claim, they must request an e-invoice (often by scanning a QR code on the receipt and submitting their company details).
A common scenario in a business-to-consumer (B2C) or a high-volume low-value business-to-business (B2B) environment is a mix of transactions where some customers provide their Tax Identification Number (TIN) and some do not.
Key Takeaway: The Consolidated E-Invoice is not a blanket solution to avoid collecting TINs altogether. It is a mechanism to simplify the reporting of high-volume transactions that lack customer-specific tax ID information
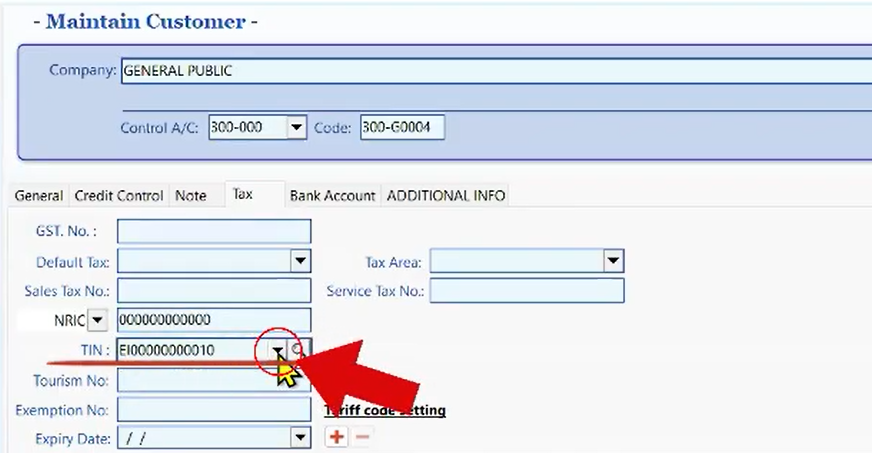
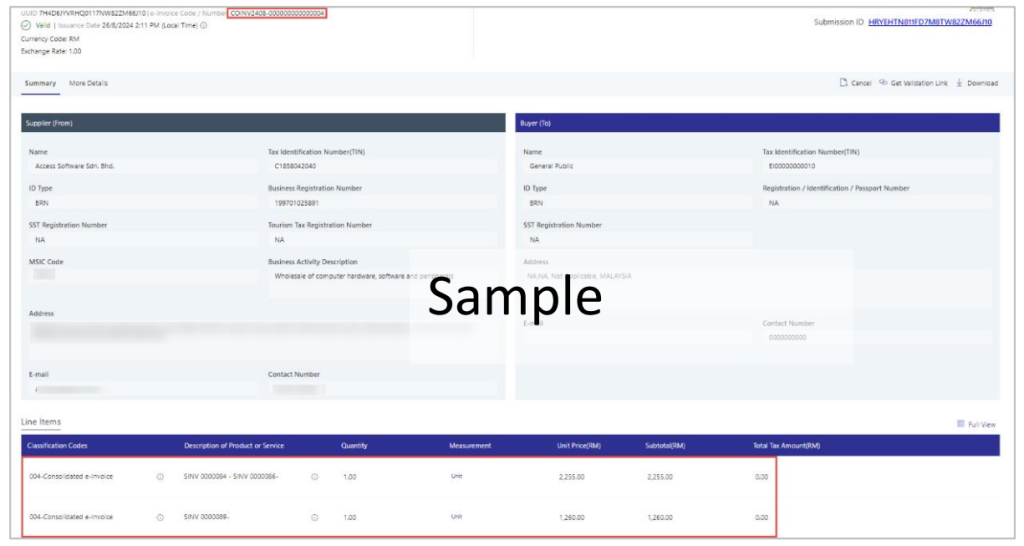
If issued a consolidated e-invoice, the classification code should be 004 and TIN no. should be EI00000000010.
Copyright © 2025 Accounts In One.
All rights reserved.
A Consolidated E-Invoice is a single e-invoice submitted to LHDN that groups multiple transactions (Invoice, Cash Sales, Debit Note, Credit Note) for a single customer within the same month.
Enable Consolidated E-Invoice Feature
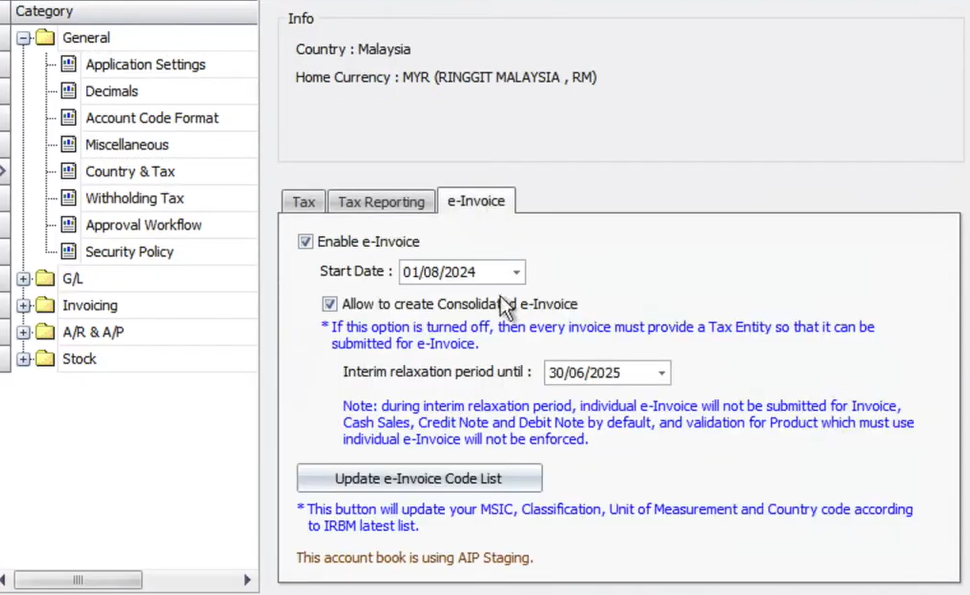
Before creating transactions, you need to ensure the consolidation feature is enabled in the system options.
1.Go to the main menu, click Tools > Options.
2.In the “Options” window, select E-Invoice under the General category.
3. Tick the checkbox Allow to Create Consolidated e-Invoice.
After saving the individual transactions, you can proceed to consolidation from the browsing screen
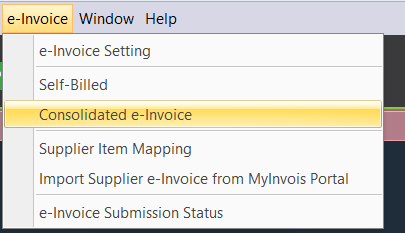
1. Click e-Invoice on the top menu bar.
2. Select Consolidated E-Invoice.
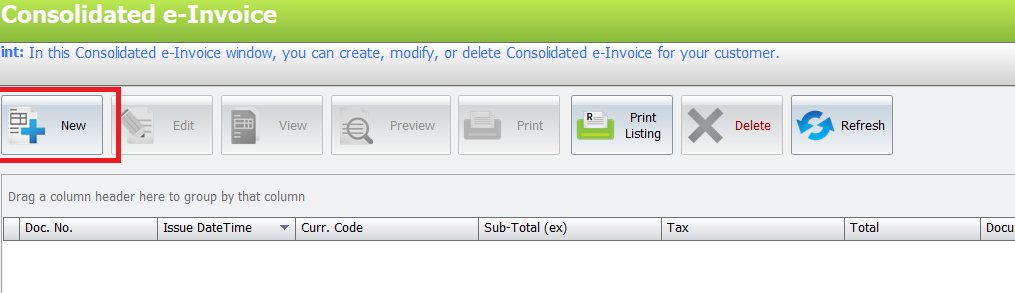
3. In the “Consolidated e-Invoice” screen, click New.
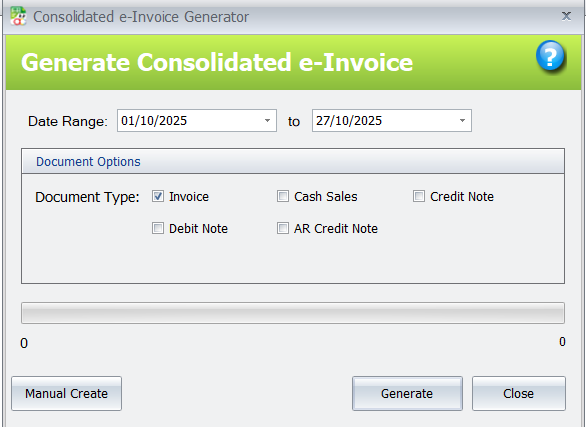
4. In the “Generate Consolidated e-Invoice” window, set the Date Range (From/To) to cover the transactions you want to consolidate.
5. Select the Document Type(s) to include in the consolidation (e.g., Invoice, Cash Sales, Credit Note, Debit Note).
6. Click Generate.
7. A Consolidated e-Invoice Review screen will appear. Review the details, and if correct, click Save.
8. A prompt will appear asking if you want to submit the e-invoice to LHDN now. Click Yes.
9. Once submitted, the status in the “Consolidated E-Invoice” screen will update to Valid after LHDN validation.
A consolidated e-invoice can be used for customers who do not require an e-invoice, allowing you to combine all invoices for the same customer within the same month and send a single consolidated e-invoice to LHDN before the 7th of the next month.
Maintain the General Public Customer
Before creating the cash sales, you should ensure a “General Public” customer profile exists and is correctly configured.
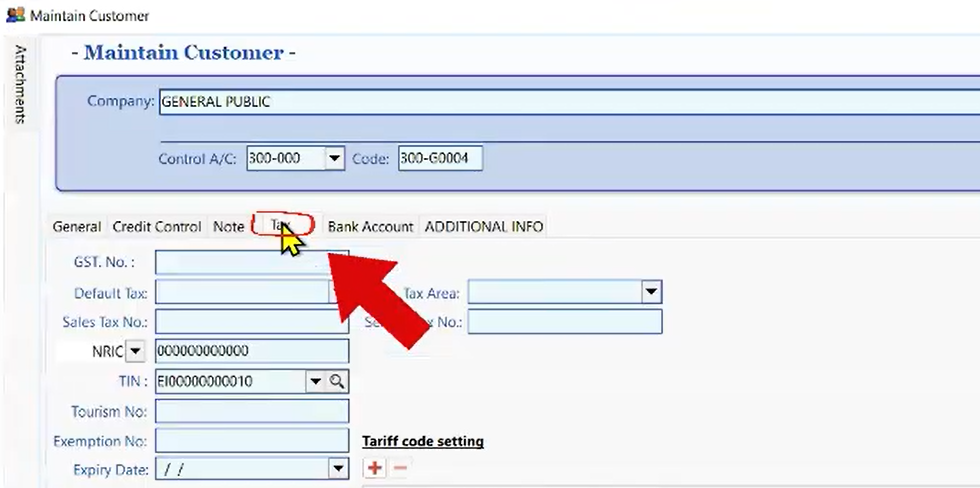
1. Go to Customer > Maintain Customer.
Select Customer from the top menu, then choose Maintain Customer.
2. Select the GENERAL PUBLIC customer.
A list of customers is shown; select the GENERAL PUBLIC entry.
3. Go to the Tax tab.
4. Set the IC No as 12×0.
5. Ensure the TIN No uses the General Public TIN number.
Select or confirm the General Public option for the TIN No. field.
Create the Cash Sales
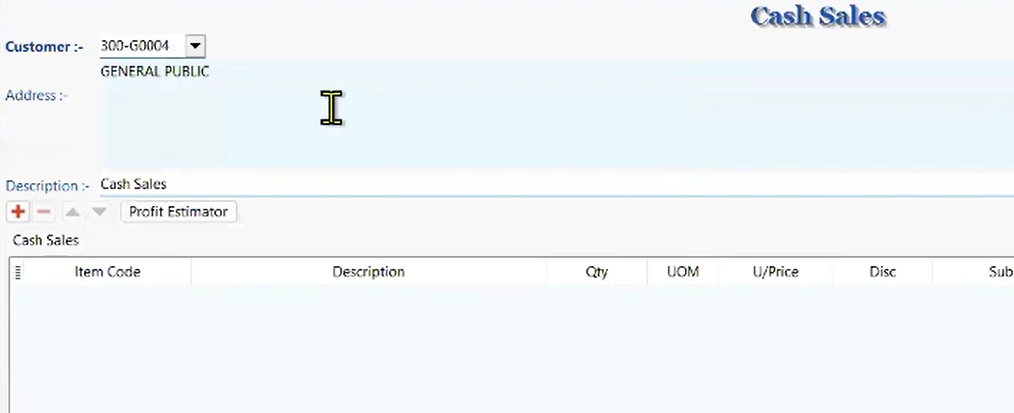
1. Go to Sales > Cash Sales.
Navigate to the main menu, click Sales, then select the Cash Sales icon.
2. Click New to create a new Cash Sales transaction.
3. Select the Customer as GENERAL PUBLIC (or a normal customer who does not require an e-invoice and whose industry permits consolidation).
Consolidate and Submit the E-Invoice
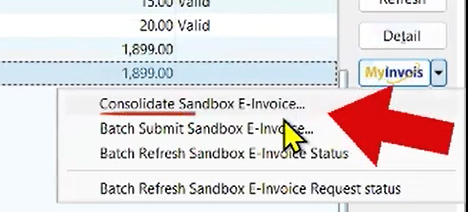
After creating all the transactions, you can consolidate them from the browsing screen.
1. Choose Consolidate E-Invoice from the dropdown menu.
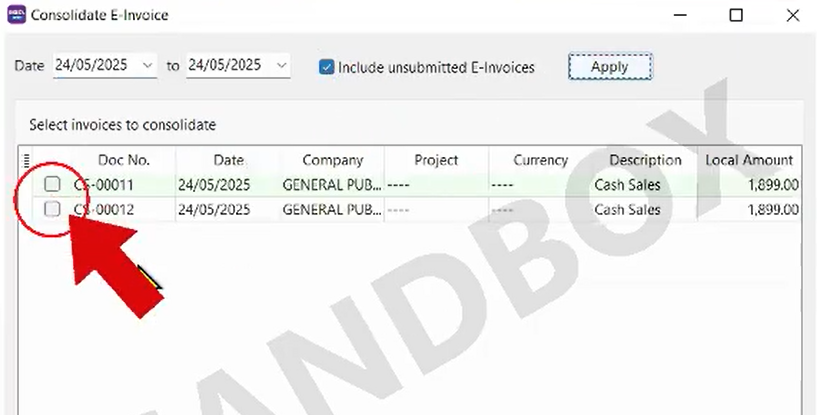
3. Check the boxes next to the transactions you want to consolidate, then click the Next button at the bottom
4. Review the Consolidated E-Invoice details and click Submit.
5.The E-Invoice Status window will pop up showing the validation status. Close the window once the validation is complete.
To help suppliers comply with e-Invoice requirements and reduce the administrative burden for both suppliers and buyers, LHDN allows suppliers to group transactions with buyers who do not require individual e-Invoices into a single consolidated e-Invoice each month.
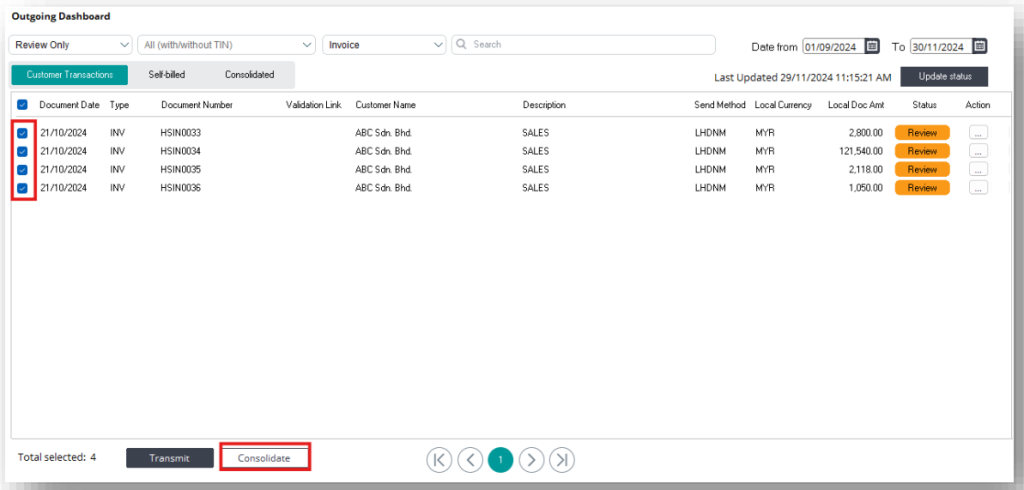
In UBS, the Consolidated e-Invoice function is available under both the Customer Transactions and Self-Billed tabs. Please note that no adjustments are allowed during the consolidation process.
Step:
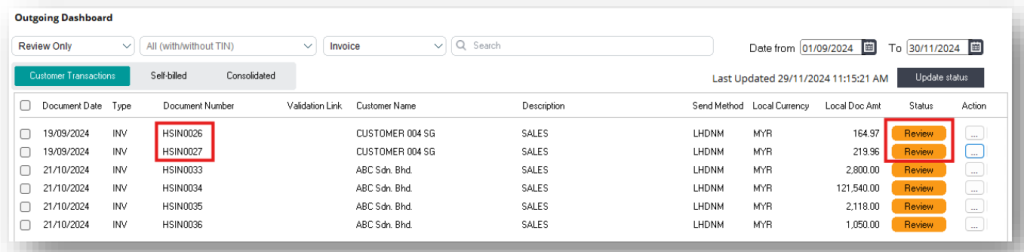
1. Select the invoices you want to include in the consolidated e-invoice. Please note that if the Approval setting is enabled, you must first approve the transaction before you can select it for the consolidated eInvoice.
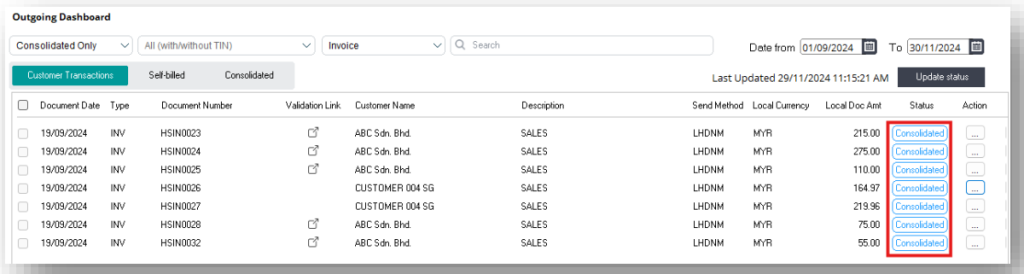
2.Once the documents are included in the Consolidated eInvoice, their status will change from Review/Approved to Consolidated.
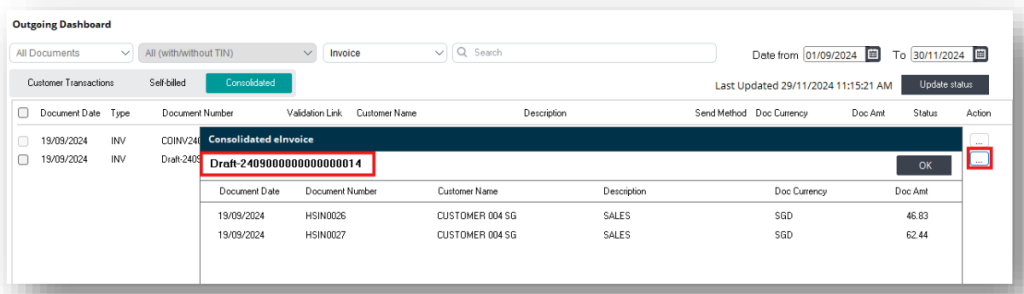
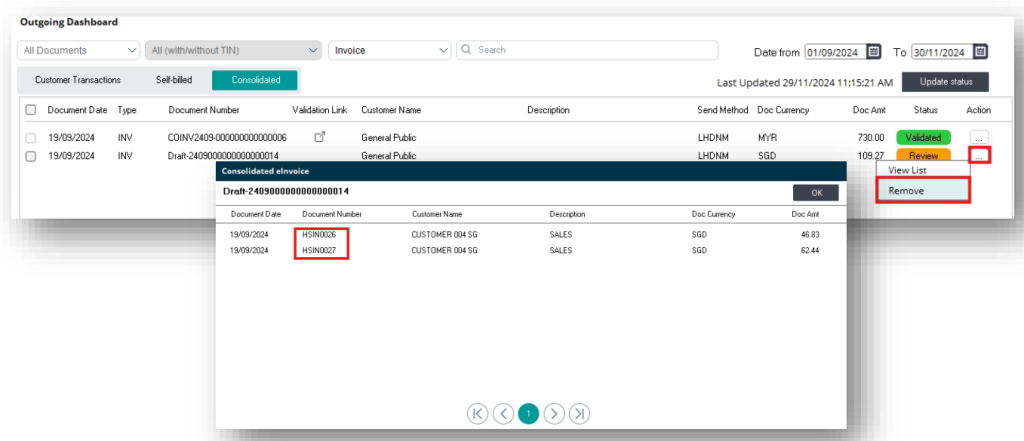
3. Now, navigate to the Consolidated tab, where you will see a new consolidated document with a draft reference created. Do note that If you select documents with different currencies, the system will automatically split them into separate consolidated documents, as only transactions with the same currency can be grouped in a single consolidated document.
4. Before transmitting, you can view the breakdown by clicking the three dots button and selecting “View List.”
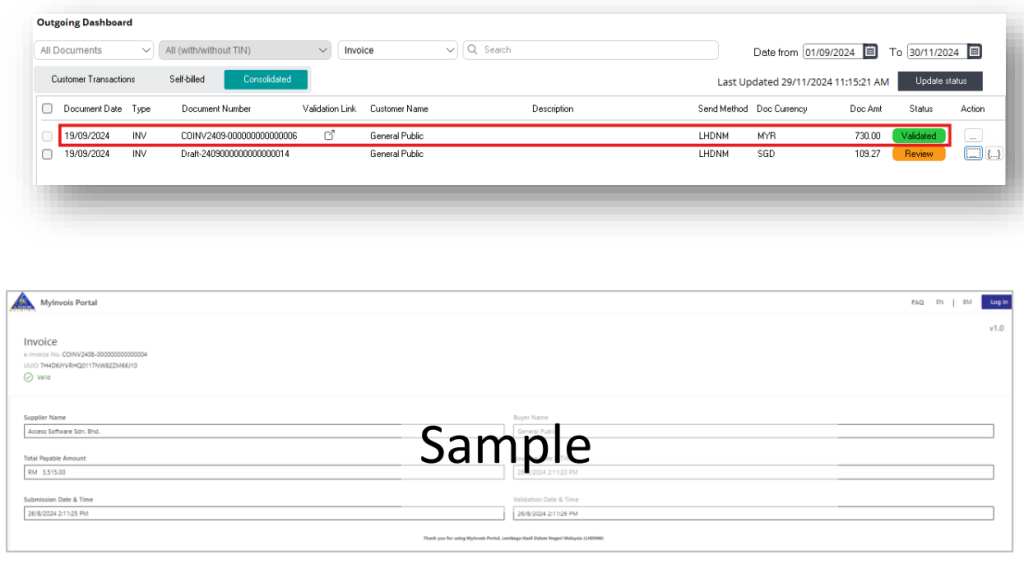
5. No approval is required for consolidated documents. Similar to a standard eInvoice, select the document using the checkbox and click on “Transmit.” The system will now generate the actual internal reference number for the consolidated eInvoice.
Once the consolidated eInvoice is successfully validated, you can click on the validation link, and the system will redirect you to the MyInvois page to view the summary of the validated eInvoice. The same UUID and validation link will be saved for each transaction within the same Consolidated eInvoice and NO PDF will be created for the consolidated eInvoice.
You can log in to MyInvois Portal to view the complete details of the Consolidated eInvoice.
Editing of Consolidated eInvoice
If you need to edit a transaction that has been included in a consolidated eInvoice, navigate to the Consolidated tab, select the consolidated eInvoice you want to edit, and click on the three dots button, then choose “Remove.”
Please note that only consolidated e-invoices with a Review status can be removed.
This action will change the status of all transactions within the same consolidated e-invoice group from “Consolidated” back to their original status.
Adjusting a Consolidated eInvoice
In the adjustment screen (e.g., Credit Note or Debit Note), you can select invoices that were previously grouped under a consolidated eInvoice for adjustment. When transmitting a Credit Note to LHDN, the system will use the reference number and UUID of the Consolidated eInvoice. Please note that only invoices from the same consolidated eInvoice can be selected and transmitted to LHDN at one time.